


Hydroseeding timeline — what your lawn looks like at every stage
One of the most common things homeowners do after a hydroseeding application is search for what their lawn should look like right now. Is this normal? Should there be more growth by week two? Why is one corner coming in faster than the rest? This guide gives you a clear, honest picture of what a hydroseeded lawn looks like at every stage from application day through full establishment so you always know where you stand.
Application day: what you see immediately after hydroseeding
The moment the hydroseeding application is complete your yard is covered in a uniform green layer. That color comes from a dye added to the mulch fiber — it is not grass and it is not permanent. The green you see on day one is the protective mulch layer doing its job. Underneath that layer the seed is in place, in contact with moisture, and beginning the process that leads to germination.
The mulch layer will look wet and vibrant immediately after application. As it dries over the next few hours it will lighten in color slightly and begin to look more like a mat than a wet slurry. This is normal and expected. The mulch is bonding to the soil surface as it dries.
Your only job on application day is to water. The first watering session should happen within a few hours of the application if the contractor did not already do a final pass. Keep the surface consistently moist from this point forward — do not let it dry out.
Days one through three: nothing visible yet
The first three days after hydroseeding are a waiting period. Nothing visible is happening above the surface. Below it, seed is absorbing moisture, softening, and beginning the biochemical process of germination. Roots have not emerged yet. Shoots have not pushed upward yet. The lawn looks exactly like it did on application day — green mulch mat, no grass.
This is the period when most homeowners start to worry unnecessarily. There is nothing wrong. Germination takes time and it starts underground before anything breaks the surface. Your job during days one through three is unchanged from day one — water consistently two to three times per day, keep the surface moist, stay off the lawn.
Do not probe the mulch layer or dig into it to check on the seed. Disturbing the mulch during this window disrupts the moisture environment around the seed and can set germination back. Trust the process and focus on watering.
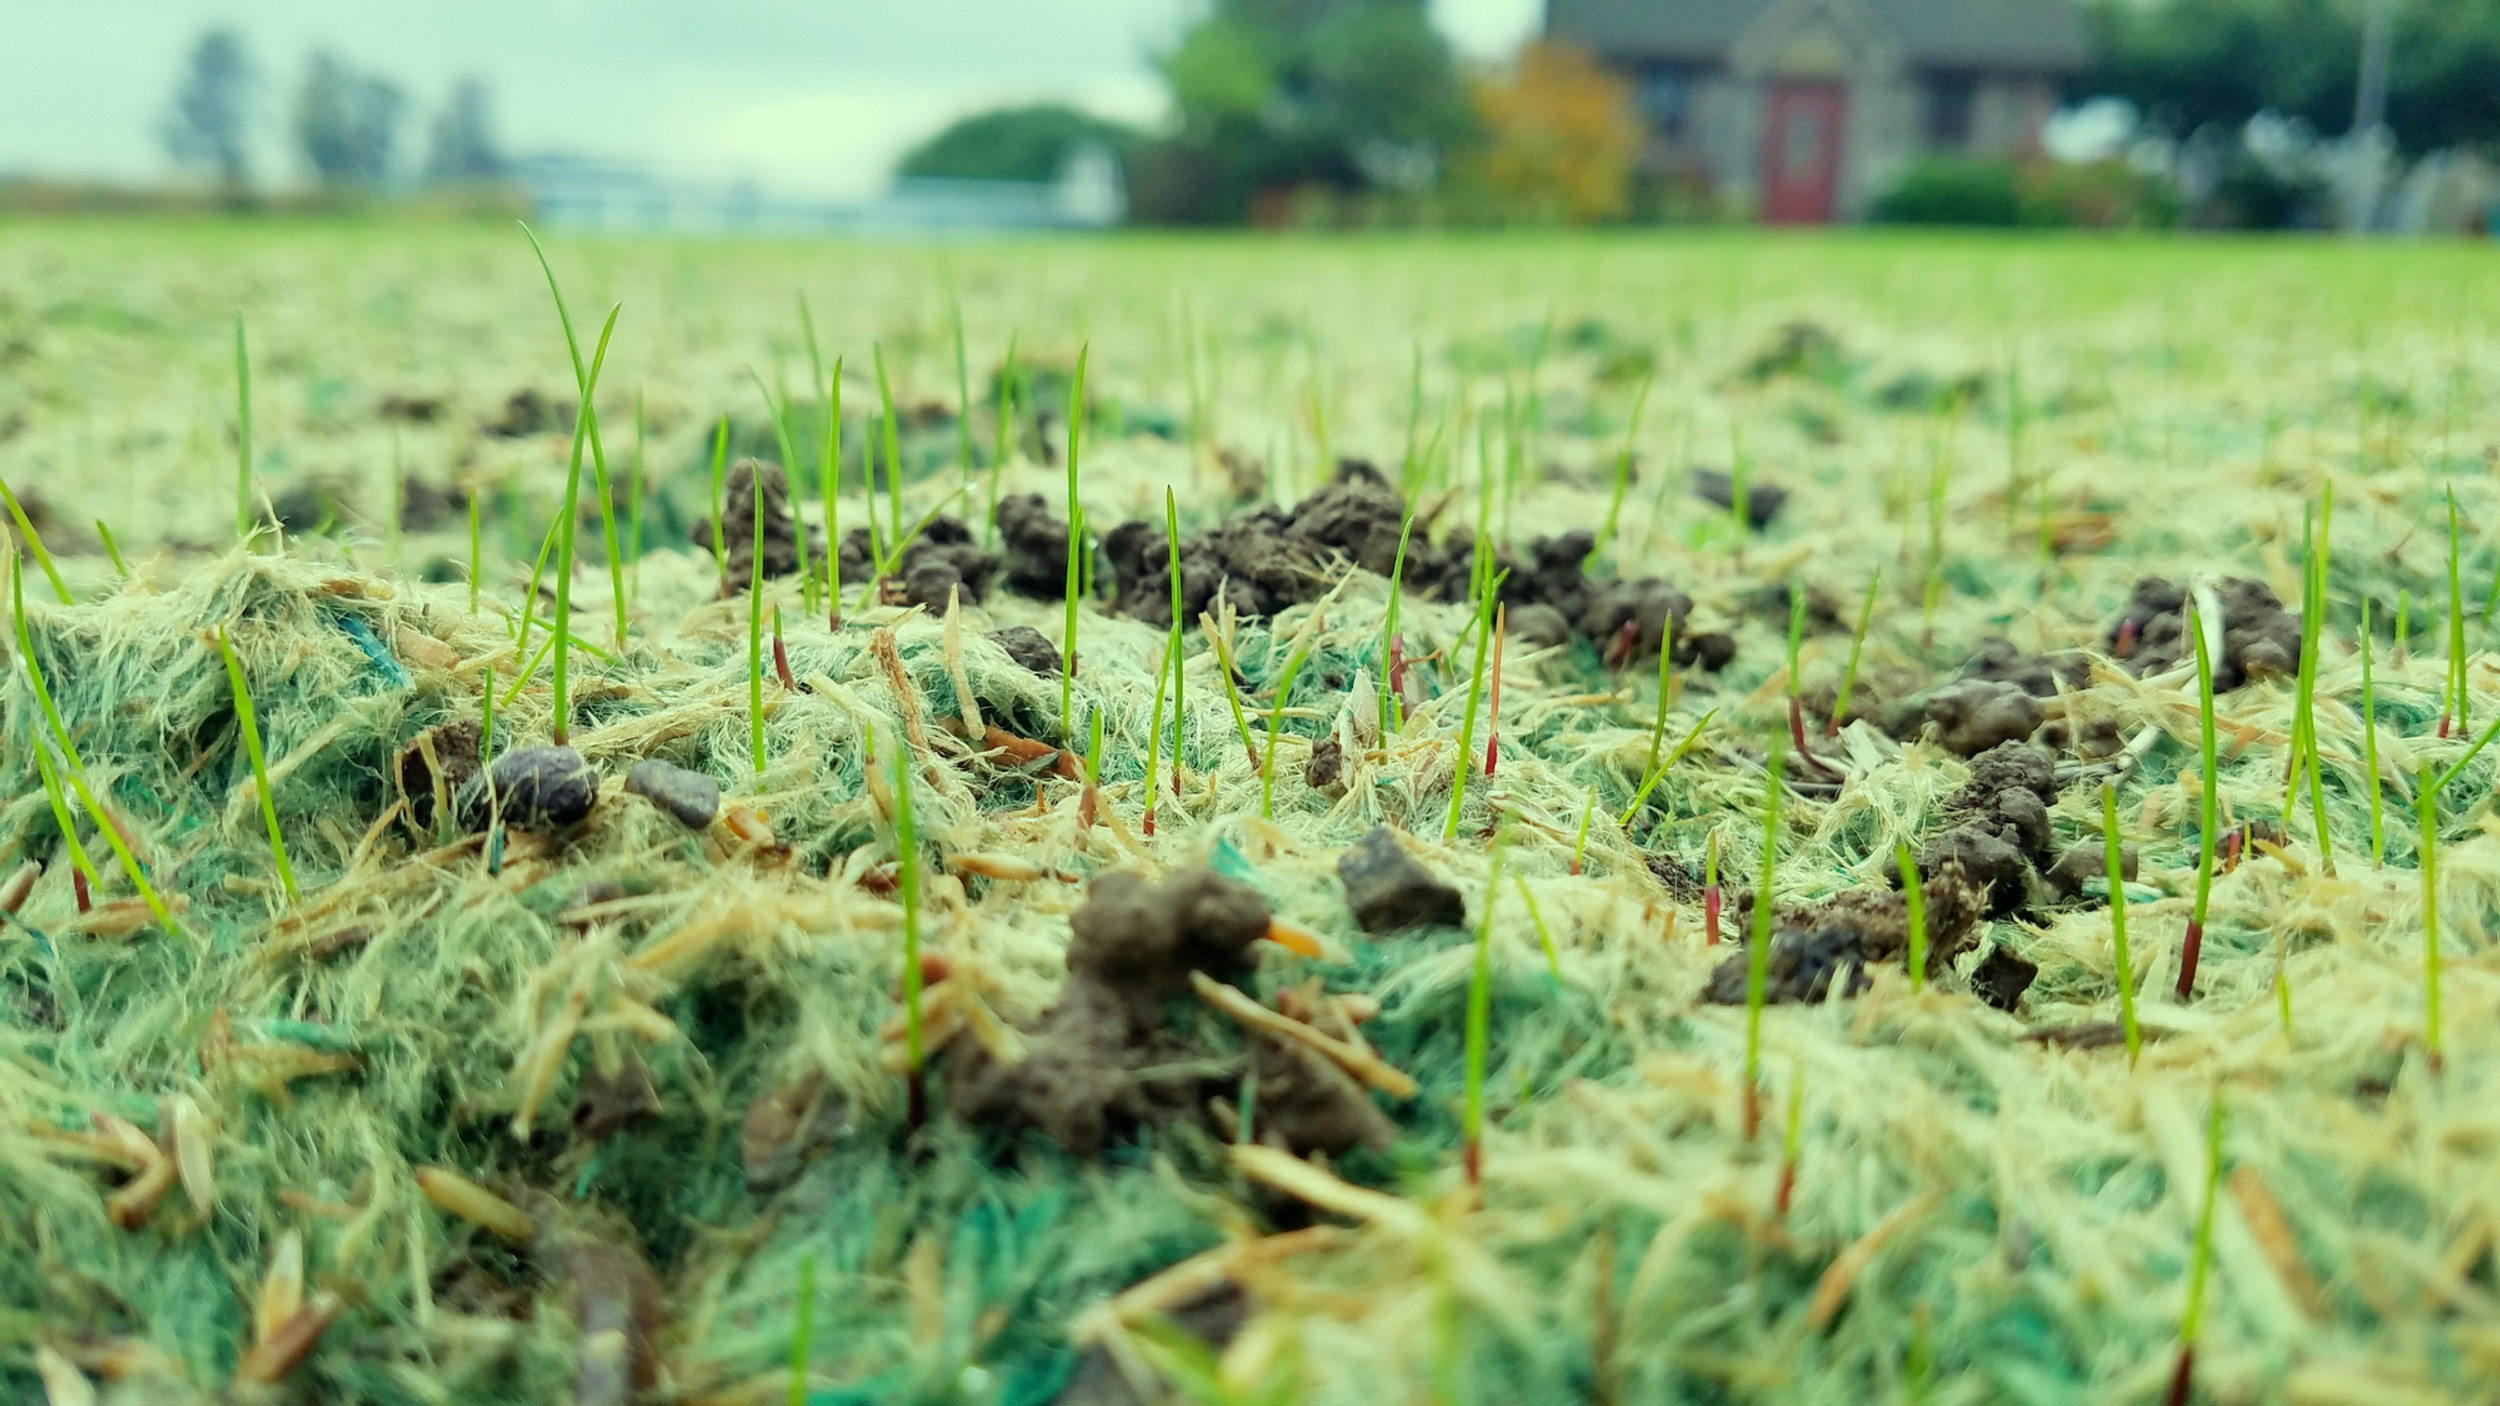
Days four through seven: first signs of life
Somewhere between day four and day seven, depending on your grass type, soil temperature, and watering consistency, you will see the first visible signs of germination. For Bermudagrass in warm DFW conditions, this typically happens around day five to seven. For Tall Fescue in appropriate fall temperatures, often day four to six.
The first sprouts are small — a thin green hair emerging through the mulch in scattered spots across the yard. Do not expect uniform coverage at this stage. The first germination is always uneven. Some areas will show early sprouts while others look unchanged. Areas with better sun exposure, slightly warmer soil temperatures, or better seed-to-soil contact will germinate first.
This uneven early germination is normal and does not indicate a problem. It indicates that germination has started, which is exactly what you want to see.
Continue watering two to three times per day. The sections that have not yet germinated still need consistent moisture, and the sprouts that are visible are still extremely fragile. Do not reduce watering frequency because you see green.
Days seven through ten: germination spreading
By the end of the first week and into day ten, germination should be spreading noticeably across the yard. What started as scattered individual sprouts is becoming small clusters of green in many areas. The mulch layer is beginning to look less solid as grass pushes through it in an increasing number of spots.
The color of the yard is changing from the uniform green of the mulch dye to a mix of the mulch color and the lighter, brighter green of emerging grass seedlings. From a distance this can look like patchy or uneven coverage — up close you can see that germination is in progress across most of the surface.
If you have areas of the yard with zero germination by day ten — no sprouts visible at all and the mulch looks exactly as it did on application day — take note of what those areas have in common. Heavy shade, a section that may have dried out more than the rest, a low spot that pooled water, or an area with different soil conditions are the most common explanations for delayed germination.
Days ten through fourteen: the lawn starts taking shape
Around days ten through fourteen the hydroseeded lawn begins to look like it is genuinely becoming a lawn. Germination has spread to most of the surface, the sprouts that emerged early are growing taller, and the overall green color of the yard is increasingly coming from grass rather than from the mulch dye.
The mulch layer is beginning to break down and fade at this point. The bright green dye color transitions to a more muted tone as the fiber decomposes, which is exactly what it is supposed to do. The decomposing mulch adds organic matter to the soil surface and its breakdown is a sign that the application is progressing normally.
Around day fourteen begin transitioning your watering schedule from frequent shallow sessions to slightly deeper, less frequent ones. The goal shifts from keeping the surface moist for germination to encouraging the young root systems that have developed to grow downward into the soil. Move from three sessions per day toward two slightly longer sessions, wetting the soil two to three inches deep rather than just the surface.
Continue keeping foot traffic and pets off the lawn. The grass is visible and growing but the root system is still very shallow and very fragile. Foot traffic at this stage compacts the soil around young roots and tears seedlings that have not yet anchored themselves adequately.
Weeks two through three: visible growth and thickening
This is the most rewarding phase of the hydroseeding timeline for most homeowners. The lawn is visibly growing, noticeably thickening, and starting to look like a real yard rather than a project in progress. Coverage that was scattered in week one is filling in. Thin areas are catching up. The overall picture is strongly positive.
The mulch layer continues to fade and break down during this period. By the middle of week three most of the original mulch color is gone and the green you see is almost entirely from grass. The transition from mulch-green to grass-green is one of the clearest visual signals that establishment is progressing well.
Grass height by the end of week three on a warm-season lawn in DFW summer conditions is typically one to two inches in the areas that germinated earliest. Continue transitioning your watering toward deeper, less frequent sessions — by the end of week three you should be moving toward one deeper session per day rather than multiple shorter ones.
The lawn still needs protection from foot traffic through week three. The grass looks established from a distance but the root system has not yet developed the depth needed to handle regular use without setback.
Week four: approaching the first mow
By week four the hydroseeded lawn should have solid, even coverage across the majority of the yard. Areas that were slower to germinate have largely caught up. The grass is growing actively and approaching the height at which the first mow becomes appropriate.
The mulch layer is largely or fully decomposed by this point. The yard looks like a lawn — not a perfect mature lawn, but a clearly established, actively growing lawn that is on a strong trajectory.
Watering by week four should be transitioning toward a mature lawn schedule — one to two deeper sessions per week rather than daily sessions. The root system has developed enough depth to sustain the lawn between waterings, and continuing to water too frequently at this stage keeps the soil too wet and discourages the deeper root growth that makes the lawn drought-resilient.
Watch for the grass reaching three to four inches in height — that is your signal that the first mow is approaching.
The first mow: weeks four to five
The first mow is a milestone that marks the transition from establishment to maintenance. For most DFW properties hydroseeded during spring or summer, the first mow happens somewhere between weeks four and five. Cool-season grass applications in fall may take slightly longer depending on temperatures.
Before mowing confirm that the grass has genuinely reached three to four inches across most of the yard — not just in the fastest-growing sections. Mowing too early on sections that are still catching up can set back the slower areas before they have established adequately.
Set the mower blade high for the first mow — two and a half to three inches minimum. Cutting too short on the first mow stresses young grass before the root system is deep enough to support recovery. Use a sharp blade, mow when the ground is dry and firm, and do not rush the height down.
After the first mow the lawn enters normal maintenance territory. Continue transitioning to a mature watering schedule, follow a seasonal fertilization program appropriate for your grass type, and manage mowing height appropriately going forward.
Weeks five through eight: full establishment
The weeks following the first mow are when the hydroseeded lawn completes the transition from newly established to fully mature. The root system is deepening with each week of proper watering and the grass is developing the density and resilience that defines a lawn that can handle a Texas summer.
By week six to eight most hydroseeded lawns in the DFW area have a root system deep enough to handle normal foot traffic, pet use, and the heat stress of a North Texas summer without significant setback. The lawn looks and functions like an established yard.
This is also the window to assess any areas that did not fully establish during the initial germination period and decide whether overseeding or spot treatment is warranted. Small thin areas that have been consistently watered but are still catching up are usually just slower-germinating sections that will continue to fill in on their own. Large bare areas that showed no germination through the first four weeks may need a touchup application.
What a normal hydroseeding timeline looks like at a glance
Application day through day three — green mulch mat, no visible germination, water consistently.
Days four through seven — first scattered sprouts emerge, uneven early germination is normal, continue frequent watering.
Days seven through fourteen — germination spreads across the yard, mulch begins to fade, begin transitioning watering depth.
Weeks two through three — visible growth and thickening, lawn starts looking established, continue deepening watering schedule.
Week four — solid coverage across most of the yard, mulch largely decomposed, transition to mature watering schedule, approaching first mow.
Weeks four through five — first mow at three to four inches, blade high, sharp, dry ground.
Weeks five through eight — full establishment, deep root system developing, normal lawn maintenance begins.
When your timeline looks different than expected
If your lawn is significantly behind this timeline — little to no germination at week two, very thin coverage at week four — the most common causes are insufficient watering during the germination window, soil temperature mismatch for the seed type, poor site preparation limiting seed-to-soil contact, or weather events that disrupted the application in the first 48 hours.
If your lawn is ahead of this timeline — solid coverage and significant growth by week two — that is good news and means conditions were particularly favorable. Continue your watering and protection schedule regardless of how fast things are progressing — the root system needs the full establishment window even when top growth is fast.
The bottom line on the hydroseeding timeline
The hydroseeding timeline from application to established lawn runs approximately four to six weeks under normal Texas conditions. Each week has a predictable set of visual milestones that tell you whether the lawn is on track. Knowing what to expect at each stage eliminates the anxiety that comes from watching a bare yard and wondering if something is wrong — and helps you make the right watering and care decisions at every point in the process.

Want to know exactly what to expect from your hydroseeding project before it starts?
Fox Hydroseeding LLC walks every homeowner through the full timeline and establishment process before leaving the job site. No surprises — just a clear picture of what your lawn will look like at every stage.
Get Your Free Estimate → foxhydroseeding.com/contact
Bring Your Property to Life With Expert Hydroseeding
Find Us On


